

Cheesecake recipe is one of those desserts that never fails to impress. With its smooth, creamy texture and rich, tangy flavor, it’s the kind of treat that makes any gathering feel a little more special. Whether you’re hosting a dinner party, celebrating a birthday, or just craving something sweet, a classic cheesecake always hits the spot.
Below is everything you need to know about making the perfect cheesecake, from ingredients to step-by-step instructions, plus some handy tips and answers to common questions.
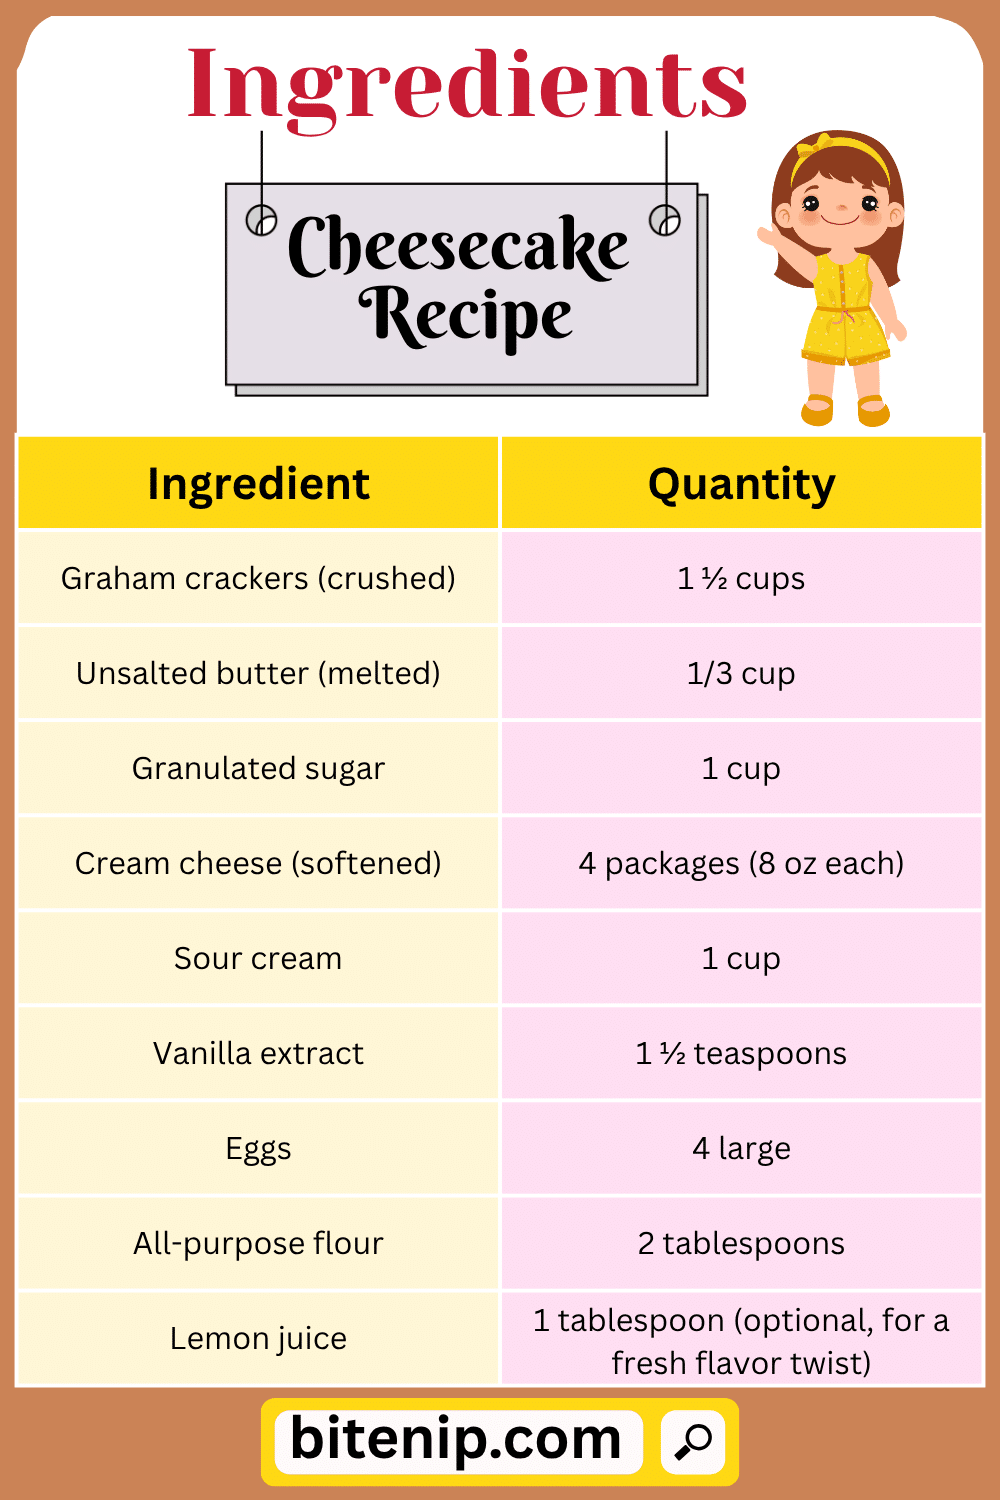
Ingredients of Cheesecake Recipe with Quantities
| Ingredient | Quantity |
|---|---|
| Graham crackers (crushed) | 1 ½ cups |
| Unsalted butter (melted) | 1/3 cup |
| Granulated sugar | 1 cup |
| Cream cheese (softened) | 4 packages (8 oz each) |
| Sour cream | 1 cup |
| Vanilla extract | 1 ½ teaspoons |
| Eggs | 4 large |
| All-purpose flour | 2 tablespoons |
| Lemon juice | 1 tablespoon (optional, for a fresh flavor twist) |
Ingredients of Cheesecake Recipe with Quantities
Step-by-Step Cooking Instructions for Cheesecake Recipe
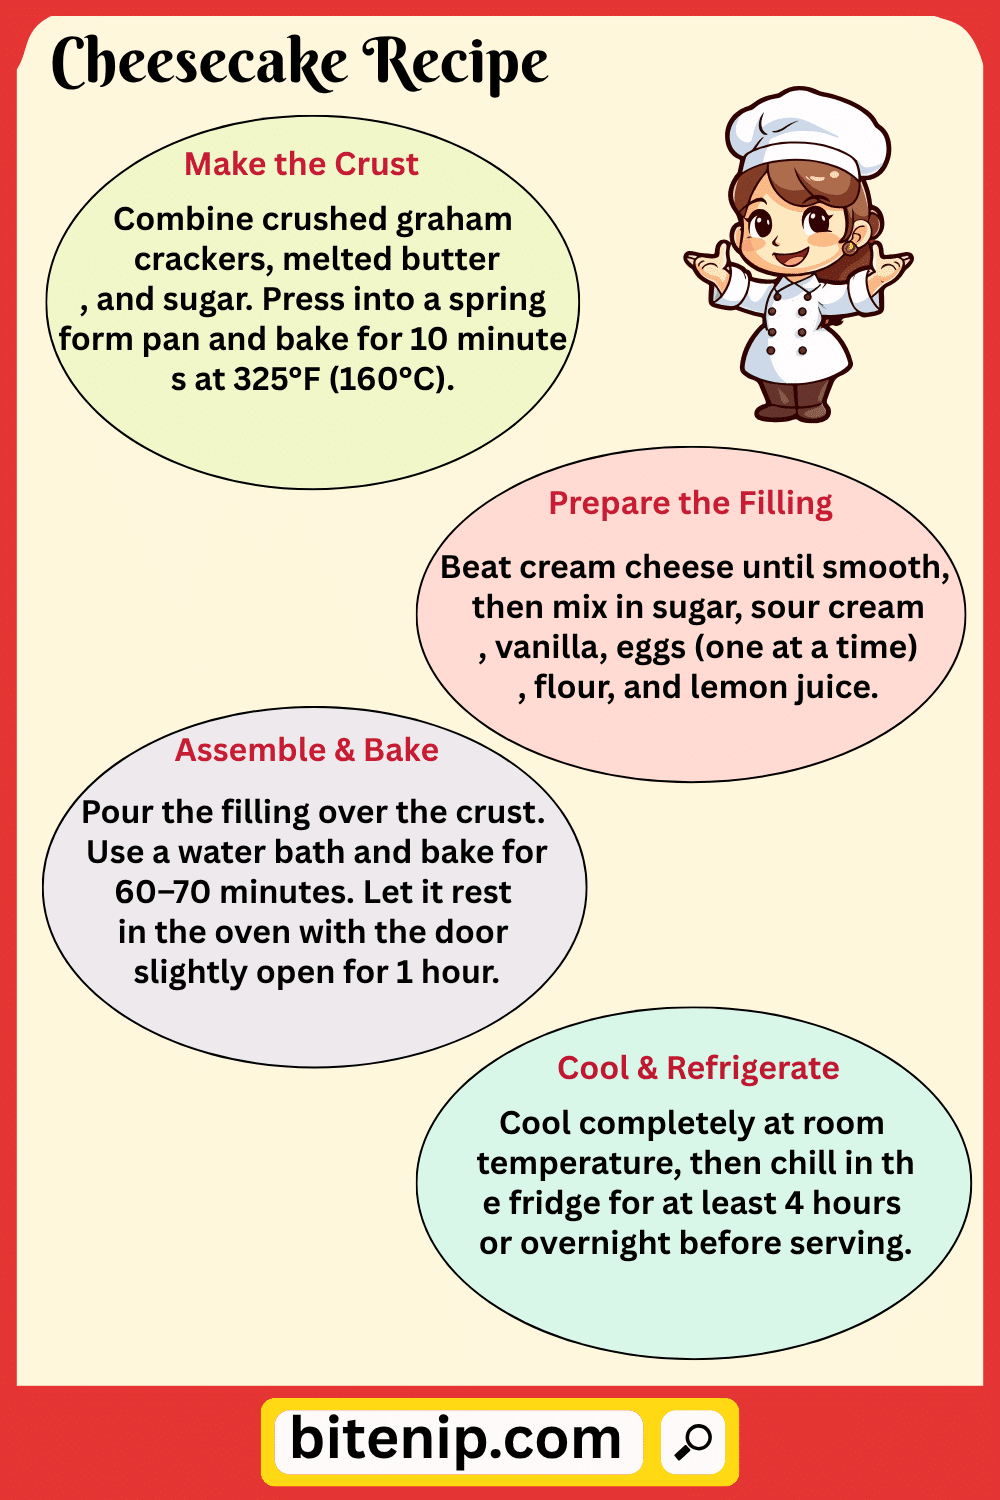
Step 1: Prepare the Crust
In a medium bowl, combine crushed graham crackers, melted butter, and 2 tablespoons of sugar. Mix until the texture feels like wet sand. Press the mixture firmly into the bottom of a 9-inch springform pan. Bake at 325°F (160°C) for 10 minutes. Let it cool while you prepare the filling.
Step 2: Make the Cheesecake Filling
In a large mixing bowl, beat the cream cheese until smooth and creamy. Gradually add the remaining sugar, sour cream, and vanilla extract. Continue mixing until well combined. Then, add eggs one at a time, mixing slowly after each addition. Finally, add flour and lemon juice (if using), and mix just until everything is blended. Avoid overmixing to prevent air bubbles.
Step 3: Pour and Smooth
Pour the cheesecake filling over the cooled crust. Gently tap the pan on the counter to release any air bubbles and smooth out the top using a spatula.
Step 4: Bake the Cheesecake
Place the springform pan in a larger baking dish and fill it with about 1 inch of hot water (this is a water bath and helps prevent cracking). Bake at 325°F (160°C) for 60–70 minutes, or until the center is almost set but still slightly jiggly. Turn off the oven and let the cheesecake sit inside with the door slightly open for another hour.
Step 5: Chill and Set
Remove the cheesecake from the oven and water bath. Let it cool completely at room temperature. Afterward, refrigerate for at least 4 hours, preferably overnight. This step allows it to fully set and develop flavor.
Step-by-Step Cooking Instructions for Cheesecake Recipe
Tips & Variations
-
No cracks tip: Always bake your cheesecake in a water bath and avoid overmixing the batter.
-
Flavor twist: Add a swirl of fruit puree, like raspberry or blueberry, before baking for extra color and taste.
-
Crust alternatives: Try crushed Oreos, digestive biscuits, or even pretzels for a different crust flavor.
-
Topping ideas: Fresh berries, caramel sauce, or a dusting of cocoa powder can elevate the look and taste.
Serving Suggestions
-
Serve chilled, directly from the fridge, with a side of whipped cream.
-
Add a drizzle of chocolate or berry compote for an elegant finish.
-
Pair with hot coffee or a glass of dessert wine for a complete dessert experience.
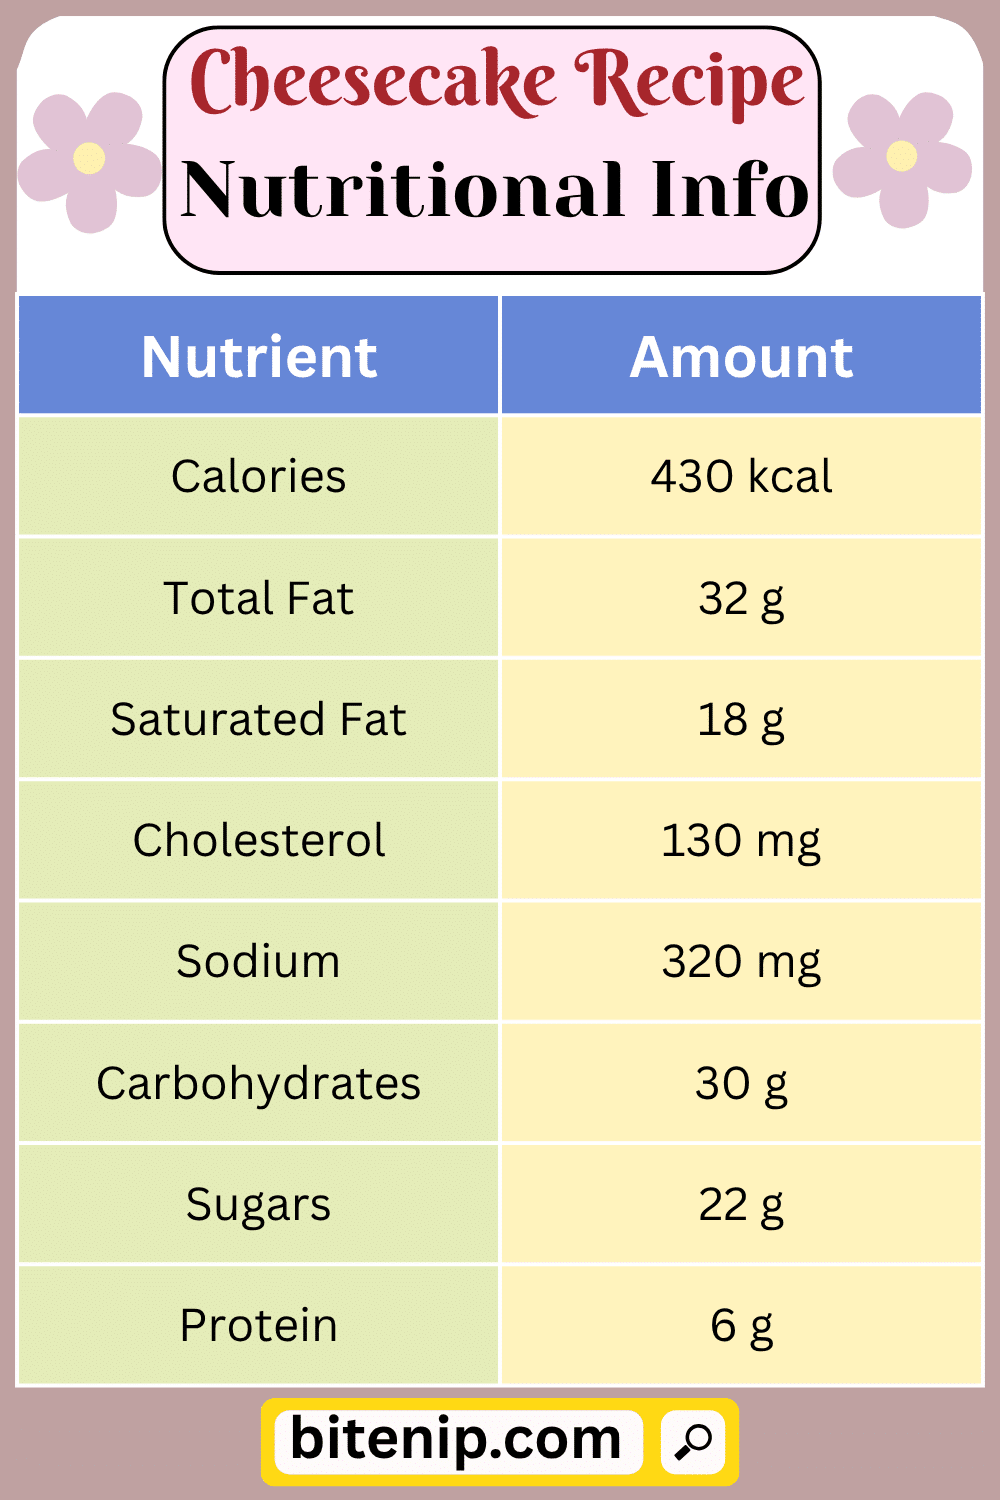
Nutritional Information of Cheesecake (Per Slice – Based on 12 Slices)
| Nutrient | Amount |
|---|---|
| Calories | 430 kcal |
| Total Fat | 32 g |
| Saturated Fat | 18 g |
| Cholesterol | 130 mg |
| Sodium | 320 mg |
| Carbohydrates | 30 g |
| Sugars | 22 g |
| Protein | 6 g |
Nutritional Information of Cheesecake
| Question | Answer |
|---|---|
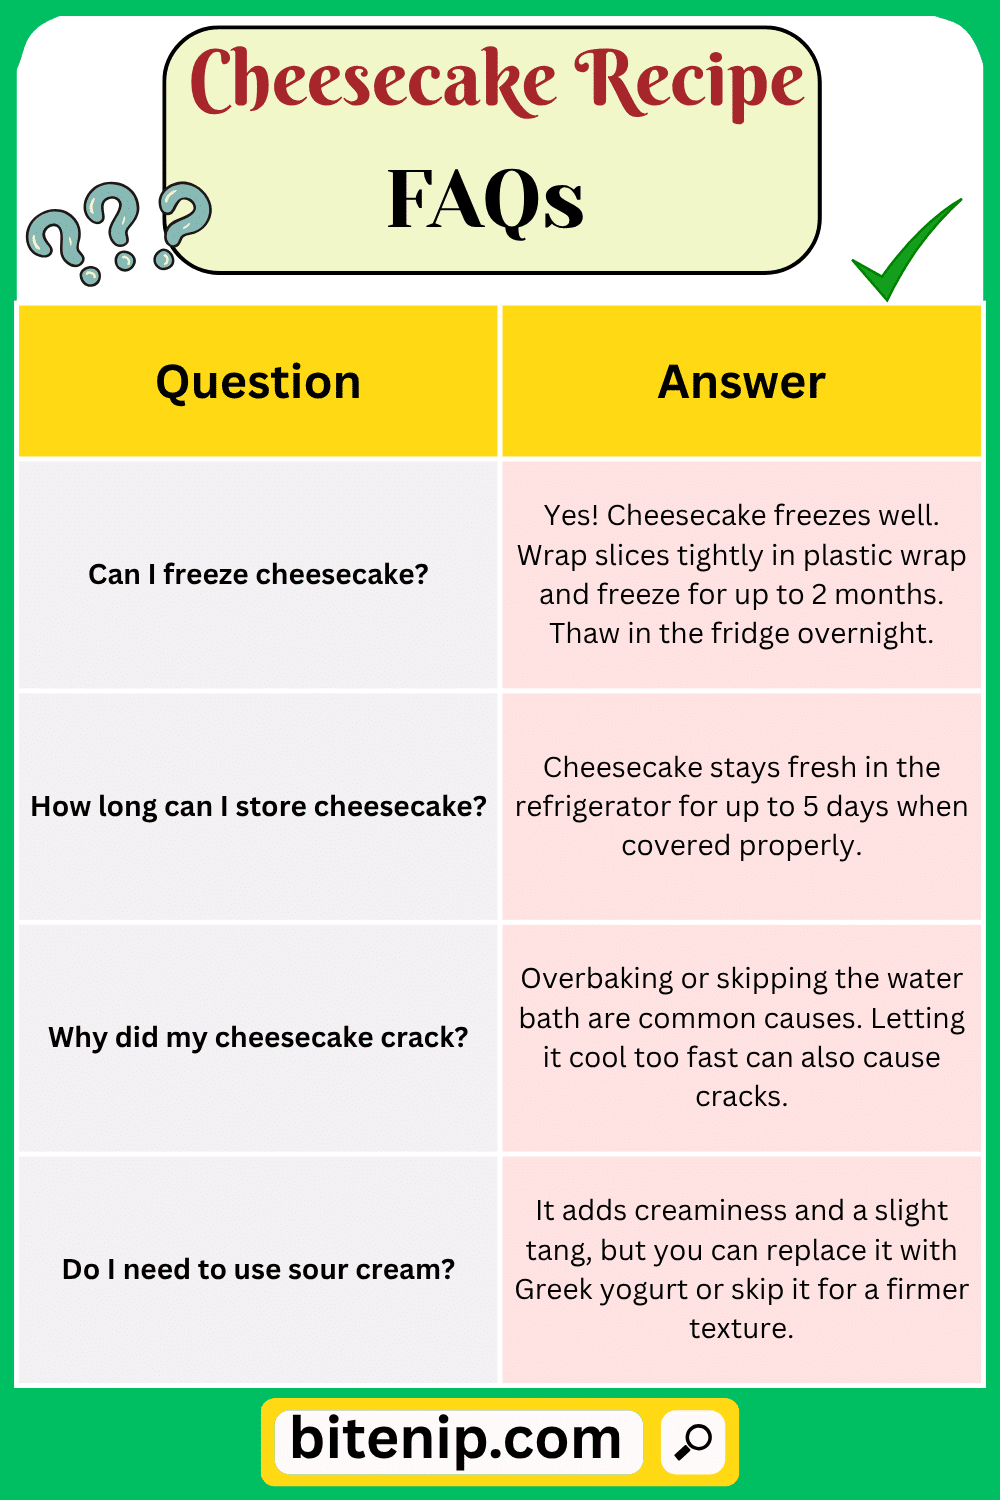
| Can I freeze cheesecake? | Yes! Cheesecake freezes well. Wrap slices tightly in plastic wrap and freeze for up to 2 months. Thaw in the fridge overnight. |
| How long can I store cheesecake? | Cheesecake stays fresh in the refrigerator for up to 5 days when covered properly. |
| Why did my cheesecake crack? | Overbaking or skipping the water bath are common causes. Letting it cool too fast can also cause cracks. |
| Do I need to use sour cream? | It adds creaminess and a slight tang, but you can replace it with Greek yogurt or skip it for a firmer texture. |
FAQs about Cheesecake Recipe
Making cheesecake at home is simpler than it seems. With just a handful of ingredients and a little patience, you can create a dessert that tastes like it came from a bakery. So next time you’re craving something sweet and special, give this cheesecake recipe a try — your tastebuds will thank you!
